Showing posts with label freezer meal. Show all posts

Sunday, February 1, 2015

The Year of No-Fuss Cooking {Breakfast Sandwiches}


This post will wrap up the No-Fuss Cooking Series. Don't worry, I guarantee that there will be plenty more slow cooker freezer meals featured on the blog, as I tend to be all about simplicity. If you have been following the series, you may have noticed how many different meals are in the picture, and also noticed that I have not posted every recipe. The Peking Chicken, while easy, was not a favorite. I most likely will not make it again. However, if you want to test it out for yourself, you can visit this blog.  Also, here is the Monster Cookie recipe if you would like - they freeze wonderfully!

Now, on to the Breakfast Sandwiches! We have a pretty set morning routine here in our busy house. We both need a good, solid breakfast to get through our day. These breakfast sandwiches were a lifesaver on those mornings that we were moving slow, but needed more than a bowl of cereal! Mister got a Breakfast Sandwich Maker for Christmas that is even quicker than the frozen sandwiches, and probably a bit better! I have never been one for speciality appliances like this, but we have thoroughly enjoyed it! They even make a *double* sandwich maker if you want to cut even more time. 

But, really... our freezer breakfast sandwiches! The key about this recipe is making enough to feed an army at one time and then prep to eat individually. The hardest part about the recipe is cleaning out the muffin tin after baking the eggs (you'll see), but if you spray it with non-stick spray, you should be good!

Ingredients:

12 English muffins
1 dozen large eggs
12 slices canadian bacon
12 slices cheddar cheese (or cheese of choice)

Directions:

Preheat oven to 350 degrees. Spray muffin tin with non-stick spray, and crack one egg in each compartment. Season with salt and pepper. Bake for 15-20 minutes, or until desired doneness. 

While eggs are cooling, slice English muffins in half, and top one side with canadian bacon and cheese. Add the egg, then the other half of the muffin. Wrap each sandwich tightly in plastic wrap, then place in a freezer bag.

To cook: Microwave for about 3 minutes, or put in the toaster oven for 5 - 10 minutes. If you are proactive, put desired number of sandwiches in the fridge the night before - this cuts down baking time.

Saturday, January 31, 2015

The Year of No-Fuss Cooking {Pulled Pork}


You have probably noticed that chicken is our go-to meat for main dishes. However, I try to mix it up occasionally. Today's no-fuss meal is an American favorite:  Pulled Pork Sandwiches. This recipe is easy and takes minimal ingredients. For my non-cooking friends, it's pretty difficult to mess this one up. =) Enjoy!

Ingredients:

1 - 3-4 lb. pork shoulder roast
12 oz. root beer (I use Henry Weinhard's)
1 bottle bbq sauce (We generally go with Sweet Baby Ray's)
Salt and Pepper

Directions:

Put the pork and root beer in a freezer bag, or directly into the slow cooker. Cook on low for 6-8 hours. Remove pork from slow cooker and shred with forks. Mix the pork with bbq sauce. You can use the liquid from the slow cooker to get the pork to your desired consistency. Season with salt and pepper and serve on a bun with coleslaw.

Saturday, January 24, 2015

The Year of No-Fuss Cooking {Salsa Chicken}

No-Fussing Number 4! Are you enjoying this series so far? I really am grateful to the fellow bloggers over at Six Sisters' Stuff, Who Needs a Cape?, and others for compiling so many great recipes... thank you, Pinterest!

This week's recipe adapted from Six-Cents is simple, delicious, and versatile. Salsa Chicken can be served with rice, as a burrito, or alone. Our favorite is definitely wrapped in a flour tortilla with the works (cheese, sour cream, lettuce, avocado, cilantro)!

Ingredients:

3-4 boneless skinless chicken breasts
1 (15 oz) can black beans, drained and rinsed
1 (15 oz) can diced tomatoes
1 (4 oz) can diced green chiles
2 cups frozen corn
1 jar salsa
1 T. chili powder
1/4 tsp. garlic powder
1/4 tsp. onion powder
1/4 tsp. red pepper flakes
1/4 tsp. dried oregano
1/2 tsp. paprika
1 1/2 tsp. cumin
1 tsp. salt
1 tsp. pepper

Directions:

Throw all ingredients into a gallon size freezer bag and freeze until ready to use. To cook, empty contents of the bag into a slow cooker and cook on low for 6-8 hours. Transfer chicken to a cutting board and let cool for a minute. Shred chicken, return to slow cooker, and mix. Serve however your heart desires!


Sunday, January 18, 2015

The Year of No-Fuss Cooking {Beef Meatballs}


The third recipe in our No-Fuss Cooking series. It is well known that I love cooking, baking, and eating. I love it even more when it is efficient and versatile. The meatballs whip up quickly in the food processor, and can be utilized in a variety of recipes: spaghetti, with rice, on a sandwich, or as an appetizer. Just flash freeze them after shaping, before you put the in a freezer bag so that they are easier to cook desired quantities.

Meatballs from "Can I Freeze It?" by Susie Theodorou

Ingredients:
One 1 1/2" thick slice rustic bread, crust removed, torn into small pieces
1/3 c. milk
1 lb. ground beef chuck
1 small onion, finely choped
2 T. chopped parsley
3 T. finely grated Parmesan cheese
Salt and Pepper
1 large egg, lightly beaten
1 T. olive oil

Directions:

Place the bread and milk in a bowl and let sit for 10 minutes until the milk is soaked up.

Place the ground beef, onion, parsley, Parmesan, salt, and pepper to taste in a bowl. Mix well with hands. add the egg and oil, and continue to mix. Finally, add the bread mixture and combine. 

Form 20 meatballs from the mixture. 

Sunday, January 11, 2015

The Year of No-Fuss Cooking {Chicken Gyoza}

Continuing the series of no-fuss cooking, including slow cooker freezer meals, quick dishes, and easy eats.

This week's recipe for Chicken Gyoza is from the cookbook "Can I Freeze It?" By Susie Theodorou. While the prep work is a bit laborious, the results are worth it. The assembly process took me back to my childhood, helping my grandfather (lovingly called "Paka") make traditional Chinese fried wontons for our entire extended family. This recipe is a bit more healthy, but every bit as delicious. These were perfect for days that Mac and I couldn't connect for dinner, as they can be cooked in single-serving portions in a matter of minutes. For us light eaters, 4-5 potstickers would make a complete dinner. If you want a bit more substance, they go well with stir fry and rice.

Ingredients:
1/4 lb. boneless, skinless chicken breast, cut into chunks
6 oz. boneless, skinless chicken thighs, cut into chunks (I used all chicken breast)
8 oz. can of whole water chestnuts, drained
4 green onions, light green and white parts only, coarsely chopped
1 c. fresh cilantro leaves, chopped
1 T. oyster sauce
1 tsp. brown sugar
1 T. cornstarch
3 T. soy sauce
1 tsp. sesame oil
Salt and pepper
1- 12oz. package dumpling wrappers

Directions:

Place the chicken in a food processor and pulse to mince. Do not allow a paste to form. Add the water chestnuts and green onions and pulse once more to finely chop the veggies.

Transfer the chicken mixture to a bowl. Using a fork, stir in the cilantro, oyster sauce, and sugar. Mix the cornstarch with the soy sauce in a small bowl until smooth, then stir into the chicken mixture. Add the toasted sesame oil, salt and pepper. 

Set the wrappers on a clean surface and cover with a damp paper towel while not using. Place on dumpling wrapper on a clean surface and place 1 teaspoon of the chicken mixture in the center. Moisten the edge of half the circle with water, then bring the ends together to form a semicircle. Starting at one end, twist and fold the edges to secure into a neat crescent, or pleat the edge seal. Repeat with the remaining wrappers and filling.

To freeze: Lin a baking sheet with wax paper and arrange the gyoza in rows, leaving space between them. Freeze until solid, about 2 hours, then transfer to a plastic freezer bag.

To cook (we like them boiled, but you can also pan-fry or steam them): Bring a large pot of salted water to a boil. Add up to 8 dumplings and cook for 8 minutes, or until heated through and the wrapper no longer looks opaque. Drain and serve with dipping sauce.


Friday, January 9, 2015

2014: The Year of No-Fuss Cooking {Balsamic Drumsticks}

2015: It's a new year, with new beginnings, and hopefully many new posts! The sudden sabbatical from the blogworld is the culprit of high ambitions to bust out a Master's degree - biting off a little more than I could chew. We survived 2014 on freezer meals, salad, and chips and salsa.

The most efficient way to ensure that we would eat during the semseter was to spend my breaks marathoning through slow cooker freezer meals. I like to gather recipes from a variety of blogs found on Pinterest, plus one of my favorite cookbooks, "Can I Freeze It?" by Susie Theodorou. I actually remembered that we need to eat more than dinner, and assembled some breakfast sandwiches as well. Mister also loves his sweet treats, so I made a massive batch of Monster Cookies, which freeze beautifully. To kick off my return to the kitchen, I will be sharing a series of these no-nonsense recipes that got us through our busy year of studying.


First up is Balsamic Drumsticks, a recipe adapted from another blog, "Who Needs a Cape?" This was one of Mac's favorites, and definitely a breeze to throw together. It's delicious on a bed of rice, or accompanying a spinach salad.

Ingredients:
8 Chicken Drumsticks
3 T. olive oil
1/2 c. Balsamic vinegar
3 T. soy sauce
1 T. honey
1/4 tsp. red pepper flakes

Directions:

Place drumsticks in a gallon size freezer bag. In a small bowl, whisk together remaining ingredients. Pour mixture into bag with drumstciks, seal, and squeeze to coat drumsticks evenly. Let marinate in the refrigerator for at least 12 hours, or freeze for up to one month. When ready, dump contents of the bag into a slow cooker and cook on low for 6-8 hours.

Monday, April 8, 2013

Slow Cooker Spare Ribs

Do you ever find yourself wishing there was more time in the day and everything took less time to do? The blog Six Sister's Stuff had a post of making 8 Freezer Meals in an hour.  Of course, I didn't believe that it really only took an hour to make EIGHT meals, so naturally, I had to test it out.  It took almost exactly 60 minutes! Being the skeptic that I am, I then doubted that the meals would actually taste good.  Proved me wrong there, also! Every meal has been delicious, and everyone who we've shared the meals with have agreed (they may just say it to be nice, but I'll take it)!

We already have a slow cooker pulled pork recipe, but I wanted to this was one of the eight meals.  This recipe had so much flavor!  I am not a huge fan of BBQ sauce, but I thought it was delicious.  It's a cinch to make, takes less than 10 minutes to prep, and can be served in a variety of ways.  Serve it on buns, over rice, with potatoes... any carb will do!

Ingredients:

1-2 lbs (country style) pork ribs
1 1/2 c. ketchup
1/2 tsp. liquid smoke (I'm pretty sure I found this in the condiments aisle..)
1 1/2  Tbsp. seasoning salt (We use Montreal Steak Seasoning from Costco)
1/2 c. brown sugar
1/2 c. white vinegar

Directions:

Place the pork ribs in a gallon-size freezer bag.  In a bowl, mix together the remaining ingredients, then pour over the ribs and seal.

Thaw for 24 hours before cooking.  Cook in the crock pot on low for 6-7 hours or on high for 3-4 hours.  I actually put the pork in frozen, pour the sauce into the crock pot, and cooked for 10 hours. It turned out just fine.

Sunday, February 19, 2012

Company Egg Bake

This is so ridiculously easy, you'll want to make it every day. Okay, maybe not everyday. Thanks to my mother-in-law for this stress-free company breakfast!

Ingredients:
1 lb. bacon
1 lb. sausage (I used 1 green bell pepper and 8 oz sliced mushrooms instead)
1 onion, diced
Plenty of grated cheddar cheese
12 eggs
2 cups cream or whole milk

Directions:
Cook up your bacon, sausage and onion until cooked through.  Spread half of the mixture in a 9x13 pan, then sprinkle with plenty of grated cheese.  Top with the rest of the mixture, sprinkle with more grated cheese.  Crack the eggs over the pan, and puncture the yolks with a fork.  Pour on the 2 cups of cream.  Refrigerate overnight, then bake for about 40-50 minutes at 350 degrees.

Friday, February 3, 2012

Bagels


Mac wanted bagels for his school lunches, so instead of going out and buying some, I made them. Crazy, I know. Quite simple, really... just a little time consuming. After they cool, I cut them all in half and freeze so they will last us a while.

Ingredients:

1 1/2 c. whole-wheat flour
2 3/4 c. all-purpose flour
2 packages active dry yeast
1 1/2 c. warm water
3 T. white sugar
1 T. salt
1 T. molasses

Directions:
  1. In large bowl, combine 1-1/2 cups flour and yeast. Mix water, 3 tablespoons sugar and salt together, and add to the dry ingredients. Beat with a mixer for half a minute at a low speed, scraping the sides of the bowl clean. Beat at a higher speed for 3 minutes. Then, by hand, mix in enough flour to make a moderately stiff dough.
  2. Turn out onto a lightly floured surface and knead until smooth and elastic (8-10 minutes). Cover, let rest for 15 minutes.
  3. Cut into 8 or 10 portions, shape into smooth balls. Poke a hole in the center with your finger, and gently enlarge the hole while working the bagel into a uniform shape. Cover, let rise until doubled, about an hour.
  4. Meanwhile, start a gallon of water boiling. Put 1 tablespoon of molasses in it, mix it around a bit. Reduce to simmering.
  5. When the bagels are ready, put 4 or 5 bagels into the water, and cook 7 minutes, turning once. Drain them. Place on a greased baking sheet, and bake at 375 degrees F for 30 to 35 minutes. Remove from oven, eat hot or cold.
  6. Broiling option: For a glossier surface, place raised bagels on an ungreased baking sheet prior to boiling them. Broil them five inches from heat for 1 to 1-1/2 minutes on each side. Then put them into the hot water to be boiled as above. Note: do not bake broiled bagels as long as non-broiled ones, 25 minutes should be long enough.


Friday, January 20, 2012

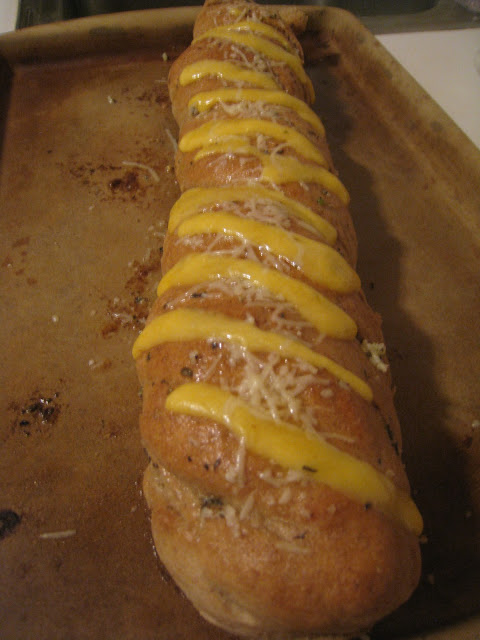
Pizza Bread

I've been craving pizza lately. The thing is, I don't really like pizza sauce... so, really, I'm just craving bread and cheese.  Well, I came across this recipe on Pinterest, and decided to mesh it with my Healthy ATK pizza crust to satisfy the craving. 
Final verdict: delicious cheesy bread and a ready-to-go crust in the freezer! You can either make two loaves of bread, two 14" pizza crusts, or one of each - both would freeze well, also.

Ingredients:

2 cups bread flour
2 cups whole-wheat flour
2 1/4 tsps. instant or rapid-rise yeast
1 1/2 tsps. salt
3 Tbsp. olive oil
1 1/2 cups warm water (110 degrees)

(For bread, you will also need cheese and herb butter)

Directions:

Pulse the bread flour, whole wheat flour, yeast, and salt in the food processor until combined.  With the processor running, pour the oil, then the water, through the feed tube and process until a rough ball forms, 30 to 40 seconds.

Let the dough rest for 2 minutes, then process for 30 seconds longer.  If the dough is sticky and clings to the blade, add 1/4 cup more bread flour, 1 tablespoon at a time, and pulse to incorporate.

Turn the dough out onto a lightly floured counter and knead it into a smooth, round ball.  Place the dough in a large, lightly greased bowl and cover with greased plastic wrap.  Let rise in a warm place until doubled in size, about 1 to 1 1/2 hours.

Punch dough down and separate dough into two balls.  To freeze pizza dough, as I did, simply wrap one ball tightly in plastic wrap and put in a freezer bag for up to one month.  Let the frozen dough thaw on the counter for 2 to 3 hours or overnight in the fridge before using.

For the bread:


Shape one ball of dough into a long baguette.  I twist mine as directed so that it holds its shape better.  Cover with plastic wrap and let rise for about 30 minutes.  Meanwhile, preheat the oven to 400 degrees.  Once warm, place bread in oven and reduce heat to 350 degrees.  Bake for 20 minutes.  While its baking, melt some butter (I used less than half a stick for one loaf) with a clove of garlic, some salt and italian herb seasoning (about 1/2 to 1 tsp of each) and slice your choice of cheese (I used about 8-10 slices of cheddar, and sprinkled with parmesan).  Brush the loaf with half of the butter, then return to the oven for 5-7 minutes or until top is golden brown.  Let bread cool for 15 minutes, then, slice into 1" slices diagonally about 3/4 of the way down.  Brush the remaining butter into slices and then tuck in the cheese slices.  Bake for about 3-5 more minutes, until the cheese is melted.  Serve immediately!

Thursday, January 5, 2012

How to stretch chickens for $10.

Not physically, of course.  I would know the first thing about stretching chickens - as much as I would like eggs, and some day hopefully will have chickens so I can have eggs, I'm pretty sure I will refuse to touch them, at any cost.  I don't think that chickens need stretching anyways... they do it themselves when they get up after laying some eggs.  Okay, enough. It's the end of a long day, and I'm starting to turn into a pumpkin.  So sad it's not pumpkin season anymore...

Sheesh. Yes, we're talking about chicken here. So here's the deal:  did you know that buying whole chicken is ridiculously cheaper than buying chicken breasts, or any other form of chicken?  It is. At Winco the other day, boneless skinless chicken breast was going for $4.99/lb.  Right next to it, whole chickens were $.99/lb. Crazy, I know.

What's crazier is that usually I buy boneless, skinless chicken breasts, even though I'm fully aware of the price difference, and the ease of cooking whole chickens.

The craziest thing, is that I finally remembered how easy it is, saved myself some bucks, and bought the whole chicken.

And made 2 different dishes.

Double-batches.

That serve 8-10 people each.

And still have left over meat for sandwiches.

Crazy.

Oh, and not to mention, I used the left over bones to make 8 quarts of chicken broth.

2 chickens, $10, and a little bit of time in the kitchen, and I've got myself a fishes and loaves situation.

Okay, so I'm done rambling, and we're going to get down to the bottom of this.  I'll tell you how to cook the chicken, you can choose what you want to do with it.  I made freezer meals for some friends in need, and used one for pan for dinner this week of Chicken and Dumplings and Layered Chicken Enchiladas.  Both freeze very well.

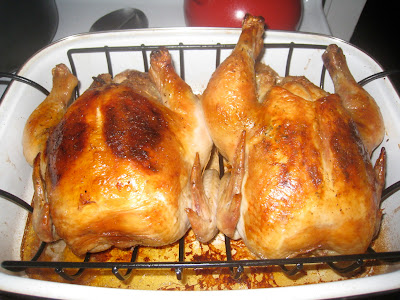
So, first, you want to make sure you have a big roasting pan.  To cook 2 birds at once, they need to not be too cramped; they can touch, but just make sure they're not too squished.  You'll also want a large u-rack.  If you don't have a roasting rack, just make your own out of a bed of quartered onions and chunks of carrots.  Works fantastic.

Preheat your oven to 375 degrees.  To prep the birds:
1. Remove the innards (This is extremely disgusting, and I have to close my eyes and think happy thoughts, otherwise I think about how I'm digging inside a chicken and grabbing its heart and liver and such... gross. Just get in there, get the job done, and get out.)

2. Pat them dry with a paper towel

3. For each chicken, mix 2 Tablespoons of softened butter with 1 Tbsp. fresh tarragon, parsley, or chives, 1/4 tsp. salt and 1/4 tsp. pepper.  I know some of you may not like the idea of using so much butter (Total it will be 6 Tbsp.), but Test Kitchen says its extremely important for keeping the chicken from drying out in the oven.

4. Rub 1 Tbsp. of the butter mixture under the skin on each breast.  I did this by using a spoon, then holding my hand over the skin and pulling the spoon out. I squished it all around; this kept my from getting my hands buttery and having them under the skin of the chicken. I find that gross too.

5.  Brush each chicken with 1 Tbsp. melted butter.  Add 2 cups of water to the bottom of the roasting pan.

6.  Roast for 40 minutes.  Increase the oven temperature to 450 degrees, rotate the pan, and roast until internal temperature (on an instant read thermometer) reads 170 degrees, about 30 minutes longer.

7.  Tip the pan so that the juice from the cavity runs into the roasting pan.  Let rest for 20 minutes on cutting board before carving.  I'm sure there's a pretty way of carving, but since I knew I was using the meat as shredded bits, I just ripped the thing apart like a scavenger.  It got the job done.


Aren't they pretty?  I was able to get about 12 cups of meat off of these.

** To make chicken broth, put each carcass/bones in a large stock pot (so two pots), fill with water, add in large chunks of carrots, celery, and onion.  Season with large spices such as thyme, sage, bay leaves, etc.  Let simmer for at least 5 hours (We did ours on med-low overnight). Discard everything, skim off the fat, then freeze in quart-sized ziploc bags.


Sunday, October 16, 2011

Bacon Quiche Tartlets


It was brunch week at our house. Also, muffin week.  Brunch because bacon is delicious; muffin because my new pampered chef tins are my current obsession.  Make these. Eat them. Don't judge me for using store bought crescent rolls.

Ingredients:

6 oz. cream cheese, softened
5 tsp. milk
2 eggs
1/2 c. shredded Colby cheese
2 T. chopped green pepper
1 T. finely chopped onion
1 tube refrigerated crescent rolls
5 bacon strips, cooked and crumbled

*I did TRIPLE this recipe to make 24 tarts, but that was because I needed them for a party... you can make however many you'll eat (which will probably be all 24).

Directions:

1.  In a small mixing bowl, beat cream cheese and milk until smooth.  Add the eggs, cheese, green pepper and onion; mix well.

2. Separate dough into eight triangles; press onto the bottom and up the sides of greased muffin cups.  Sprinkle half of the bacon into cups.  Pour egg mixture over bacon; top with remaining bacon.

3.  Bake uncovered at 375 for 18-22 minutes or until a knife comes out clean.  Serve warm.


Tuesday, October 11, 2011

Quiche Lorraine Muffins

I have a new pampered chef muffin tin that has been begging me to make something delicious in it.  I'm feeling a little sugar-overloaded, so I went for a savory muffin.  These were fairly simple to make and have quite a few variations - I made them with mushrooms rather than bacon (only because I made another quiche dish with lots of bacon).  Enjoy!


Ingredients:
1/4 c. canola/vegetable oil
6 strips bacon, roughly chopped (I substituted 1 1/2 c. thinly sliced mushrooms)
4 medium scallions, thinly sliced
2 c. all-purpose flour
1/2 c. yellow or white cornmeal
1 T. baking powder
1 T. sugar
1/2 tsp. salt
1 large egg, room temperature
2 large egg yolks, room temperature
1 c. whole milk
1 1/4 c. shredded Gruyere (5 oz) (This is pretty spendy... I read a lot of reviews that said you can sub swiss cheese for Gruyere and get similar flavor. I used colby jack, and it was a little bland)


Directions:

1. Preheat the oven to 400 degrees and prep your muffin tin (if it's nonstick, don't spray it)

2. Heat a medium skillet over medium heat.  Swirl in 1 T. of the oil, then add the bacon and saute for 1 minute.  Add the scallions and cook for 2 minutes, stirring occasionally, until the scallions are wilted and the bacon is lightly browned.  Transfer to a large bowl and cool for 10 minutes.  (If using mushrooms, saute mushrooms and scallions for 4 minutes).

3.  Meanwhile, whisk the flour, cornmeal, baking powder, sugar, and salt in a medium bowl util well blended.  Set aside. Whisk the egg, egg yolks, and the remaining oil into the bowl with the bacon.  Stir in the milk and cheese until well incorporated.  Finally, stir in the dry ingredients until moistened.

4.  Fill the tins three-quarters full.  Bake for 18 minutes or until lightly browned and a toothpick inserted in the center of one comes out with a few crumbs attached.


5.  Set the pan on a wire rack to cool for 10 minutes.  They can freeze for up to 3 months in the freezer.

Sunday, May 1, 2011

White Chicken Enchiladas

I forgot to give credit for this delicious recipe... thanks to co-worker, Nick, for introducing us to this fantastic enchilada recipe at a potluck!  We found that this makes a great freezer meal - I made two batches for the neighbors when they had their new baby.  Enjoy!
Ingredients:
1 cup chopped onion
1/2 cup chopped green pepper
2 Tbsp. butter
2 cups cooked, chopped chicken
4 oz.  can chopped green chilies
3 tbsp. butter
1/4 cup flour
1 tsp. ground coriander
3/4 tsp. salt
2 1/2 cups low sodium chicken broth
1 cup sour cream
1 1/2 cups shredded monterey jack cheese
12 6" tortillas at room temperature

Directions:

Saute onion and green pepper in 2 Tbsp butter, combine with chicken and chilies in a bowl.

For sauce, melt 3 Tbsp butter, stir in flour, coriander and salt.  Whisk in broth and stir until thickened and bubbly.  Remove from heat and stir in sour cream and 1/2 cup cheese.  Stir 1/2 cup sauce into chicken mixture.

Fill each tortilla with 1/4 cup chicken mixture and place in greased pan:
6 enchiladas per square pan, topped with 1 cup sauce and 1/2 cup cheese
12 enchiladas per 9x13 topped with 2 cups sauce and 1 cup cheese.

To freeze: wrap well with foil, label, and date.  Freeze for up to 2 months.

To Bake: to eat same day, bake uncovered at 350 degrees for about 25 minutes or until bubbly.  From frozen, thaw completely and bake as mentioned, or bake covered 1 hour, then uncover and bake 25 more minutes until hot and bubbly.


Thursday, April 14, 2011

Homemade Poptarts!

Novelty.  I'm not sold on the current state of this recipe, but simply the idea of a homemade pop-tart is solid in my book!  I plan to play with the ingredients a little more and see if I can create a slightly sweeter and flakier dough.

Thanks to Heavenly Homemakers for the recipe!


3 1/2 cups whole wheat flour
1 teaspoon sea salt
1 cup melted butter
1 cup plain yogurt
About 5 ounces of 100% fruit jelly or jam (I used my homemade blackberry)
Begin by mixing the flour, salt, butter and yogurt. 
Knead the dough just a little bit to make it nice and workable.  Roll out the dough on a large, well floured surface.  Use a knife to cut the dough into the desired poptart size you would like.  
Place about a 1/2 teaspoon of jelly on 1/2 of the dough rectangles.  Spread the jelly around, leaving the edges free.
Top each jelly-coated rectangle with a plain one.  Seal the two together using a fork.  Bake in a single layer at 350 degrees for about 25 minutes, until they are golden brown.
*I put the entire batch in the freezer and then reheat them in the toaster - delicious afternoon snack!